
PROJECT: TINY HOME 101
Welcome to my world...

After much begging, he finally gave in and gave it to me. :) I love him!
And you know, he's not afraid of me having this disease....he's actually talking about what "we" have to do to ready it for my (our) tiny home.
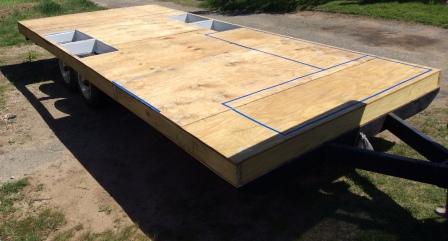
After some reviewing and re-measuring of the tiny home trailer, I have discovered that my initial footage is about 4" smaller than I originally thought. This is due to failing to take into consideration the position and thickness of the framing walls. With that, I needed a visual. On paper it looked as though I had a ballroom sized area to fill. Not so....here's my visual:

So...here's looking from the tongue to the rear of the trailer. I placed some 4x4's down where the pressure treated frame will go. The plywood in the front will be where the front open deck will be, so I won't be able to include this in my interior dimensions. I also think I need to box in the wheel wells so I don't bottom out during travel. This is another area where I need some specifications. (what did I get myself into?)

I'll keep you posted.

Rear..............................Another layout option.....................Front
(side view)
While browsing the internet last night, I found this great idea on Pinterest

Tiny House Trailer Inspection March 2015
 The snow has melted enough to get a good look at my trailer for the tiny....after close inspection of these sorry looking sneakers, I've decided
to bite the bullet and purchase four new wheels and rims.
I would rather do it correctly from the ground up than not and wishing I had. Safety first, right?
Sunday morning I grabbed a can of PB Blaster and sprayed each lug nut generously. If this doesn't help with breaking free the rusty lugs, I will have to use a torch and impact to get them off. One thing that worried me is on the last of the four tire inspections, I noticed there was a missing lug nut and a portion of the stud! I will keep my fingers crossed that I get these old wheels off without having to burn all the studs off.
Watch for the update...
May 2015
I bought brand new heavy duty trailer tires and they are mounted on my trailer on "go fast" rims we had kicking around. I feel much better just knowing I went the new tire route. Safety has got to be #1 on this tiny beach house build.


Yes, beach house. I've decided it will be my "beach house" for many reasons. Firstly, many many years ago, I dreamed of one day living in a beach house. I could envision myself sitting on the ocean side deck sipping my morning coffee and breathing in all the freshness of the sea. That vision never happened. I did end up living another dream....our cabin in the woods. I love our cabin, but my dream of a beach house still lives within. My tiny house on a trailer will be my beach house which I can tow to the beach for a weekend stay. That will suit me just fine.
Update 7-23-15
My darling husband made a deal with me a few weeks ago...he said, "If you help me install the windshield frame in the CJ5, I will do the welding on the Beach House trailer. (eeeeeeeeek!!!) No brainer...I said "DEAL!!!"
He started on Sunday by moving the trailer down into the driveway near the garage and grinded the areas for welding with the help of a friend who stopped by.


 My vintage chaise lounger needed welding,
so she hopped on for the ride :)


While browsing the internet last night, I found this great idea on Pinterest
Yup, I'm going to try this!
Tiny House Trailer Inspection March 2015
to bite the bullet and purchase four new wheels and rims.
I would rather do it correctly from the ground up than not and wishing I had. Safety first, right?
Sunday morning I grabbed a can of PB Blaster and sprayed each lug nut generously. If this doesn't help with breaking free the rusty lugs, I will have to use a torch and impact to get them off. One thing that worried me is on the last of the four tire inspections, I noticed there was a missing lug nut and a portion of the stud! I will keep my fingers crossed that I get these old wheels off without having to burn all the studs off.
Watch for the update...
May 2015
I bought brand new heavy duty trailer tires and they are mounted on my trailer on "go fast" rims we had kicking around. I feel much better just knowing I went the new tire route. Safety has got to be #1 on this tiny beach house build.


Yes, beach house. I've decided it will be my "beach house" for many reasons. Firstly, many many years ago, I dreamed of one day living in a beach house. I could envision myself sitting on the ocean side deck sipping my morning coffee and breathing in all the freshness of the sea. That vision never happened. I did end up living another dream....our cabin in the woods. I love our cabin, but my dream of a beach house still lives within. My tiny house on a trailer will be my beach house which I can tow to the beach for a weekend stay. That will suit me just fine.
Update 7-23-15
My darling husband made a deal with me a few weeks ago...he said, "If you help me install the windshield frame in the CJ5, I will do the welding on the Beach House trailer. (eeeeeeeeek!!!) No brainer...I said "DEAL!!!"
He started on Sunday by moving the trailer down into the driveway near the garage and grinded the areas for welding with the help of a friend who stopped by.


so she hopped on for the ride :)


It's looking better each day!
 The rear bumper is welded on!


Reinforcements

Materials
 Bumper painted black


Plywood cut and secured

Tail lights mounted and wires run
August 2015 update...
I am (impatiently) waiting for the pressure treated plywood to cure so I can protect it with marine paint. This first sub layer will be my barrier from the ground and road. Once this is cured and painted, I can begin the 2x6 sub flooring. I am so impatient!!! Seriously, my plan was to have the shell built and weather proofed by snow fall this year. Can we all keep our fingers crossed for me? Thank you.
I am (impatiently) waiting for the pressure treated plywood to cure so I can protect it with marine paint. This first sub layer will be my barrier from the ground and road. Once this is cured and painted, I can begin the 2x6 sub flooring. I am so impatient!!! Seriously, my plan was to have the shell built and weather proofed by snow fall this year. Can we all keep our fingers crossed for me? Thank you.
November 2015 update...
Sunday was a very exciting day for me. The 2x6 sub-flooring was constructed and now rests on the steel frame of the trailer. The duplex wire was run and cut awaiting connection and new brakes. It might not sound like much, but it is. It's very big. And, a great big thank you going out to Larry Drake and my husband for their help and guidance. Here are some photos...


(saving the "beach house" wine for its Christening!)
until next time...
Big Weekend!!
I am so happy to report how much I got done this weekend!
Check it out...

paint which went on the trailer frame paint facing the ground.


UPDATE: March 21st, 2016
Spring is finally here even though mother nature played this snowy white joke on us this morning!


I then drilled each corner of each wheel well to fit the jigsaw blade in to start the cut. But, then I was taught how to "plunge" cut with a circular saw. It was tricky at first, but I got the hang of it. I trimmed up the corners with the jigsaw.
Until next time.....
Update:
Time.....this I need. Weather....good weather is also what I need to forge on. I've really had neither. However, I am planning (weather permitting) to get going on building the walls and windows next month.
In the meantime though, I thought I'd share a few photos from my waiting...


...for wheel well liners.


Until July.....
Just last night I scored the last piece of the puzzle....the beach house door! Bonus.....it was listed on Craigslist by a neighbor about 1/4 mile away from me!

The puzzle pieces are now complete. I have all my windows, my door, and all my 2 x 4's to begin constructing the walls. See you in July!!!
Hello July!
This is the month of "full steam ahead!"
We started this round of work last Wednesday and I just want to give you a brief pictorial of what was accomplished...
WEDNESDAY:

 We used the trailer deck as our work bench to lay out the front and rear walls. Both walls were trimmed out for the windows.
THURSDAY:


 Side walls were studded, windows and door trimmed out, and all four walls attached on deck! Big day!
Hello July!
This is the month of "full steam ahead!"
We started this round of work last Wednesday and I just want to give you a brief pictorial of what was accomplished...
WEDNESDAY:


THURSDAY:


FRIDAY:


Roof rafters, plywood and tar paper on.
SATURDAY and SUNDAY:


Sheathing on.
MONDAY:

 Drip edge installed.


(Tuesday...needed more materials)
WEDNESDAY:
House wrap on.
I'll have to add that photo in a bit...technical difficulties.
Here's the most recent photo...
 Sending out a "thank you" to my friend Frank for helping me hook up and move this beauty to mow the grass under it!
 Just this simple move kept me motivated, even in this humid weather we've had for ever! I installed the bathroom window!


And hopefully next up on the beach house build will be the tin roofing. Just trying to wait for a break in this horrible weather.
Until then...

While waiting for the weather opportunity to install the tin roofing, I put 4" 5/16 lag bolts with washers in the sill plates to secure the structure to the 2x6 sub floor joists.

I also installed hurricane brackets at each rafter inside for more strengthening.

Last night, I got a bit curious as to how pieces were going to fit in the space....looking toward the rear, on the left is the kitchen sink bureau, beyond that is the shower curtain.
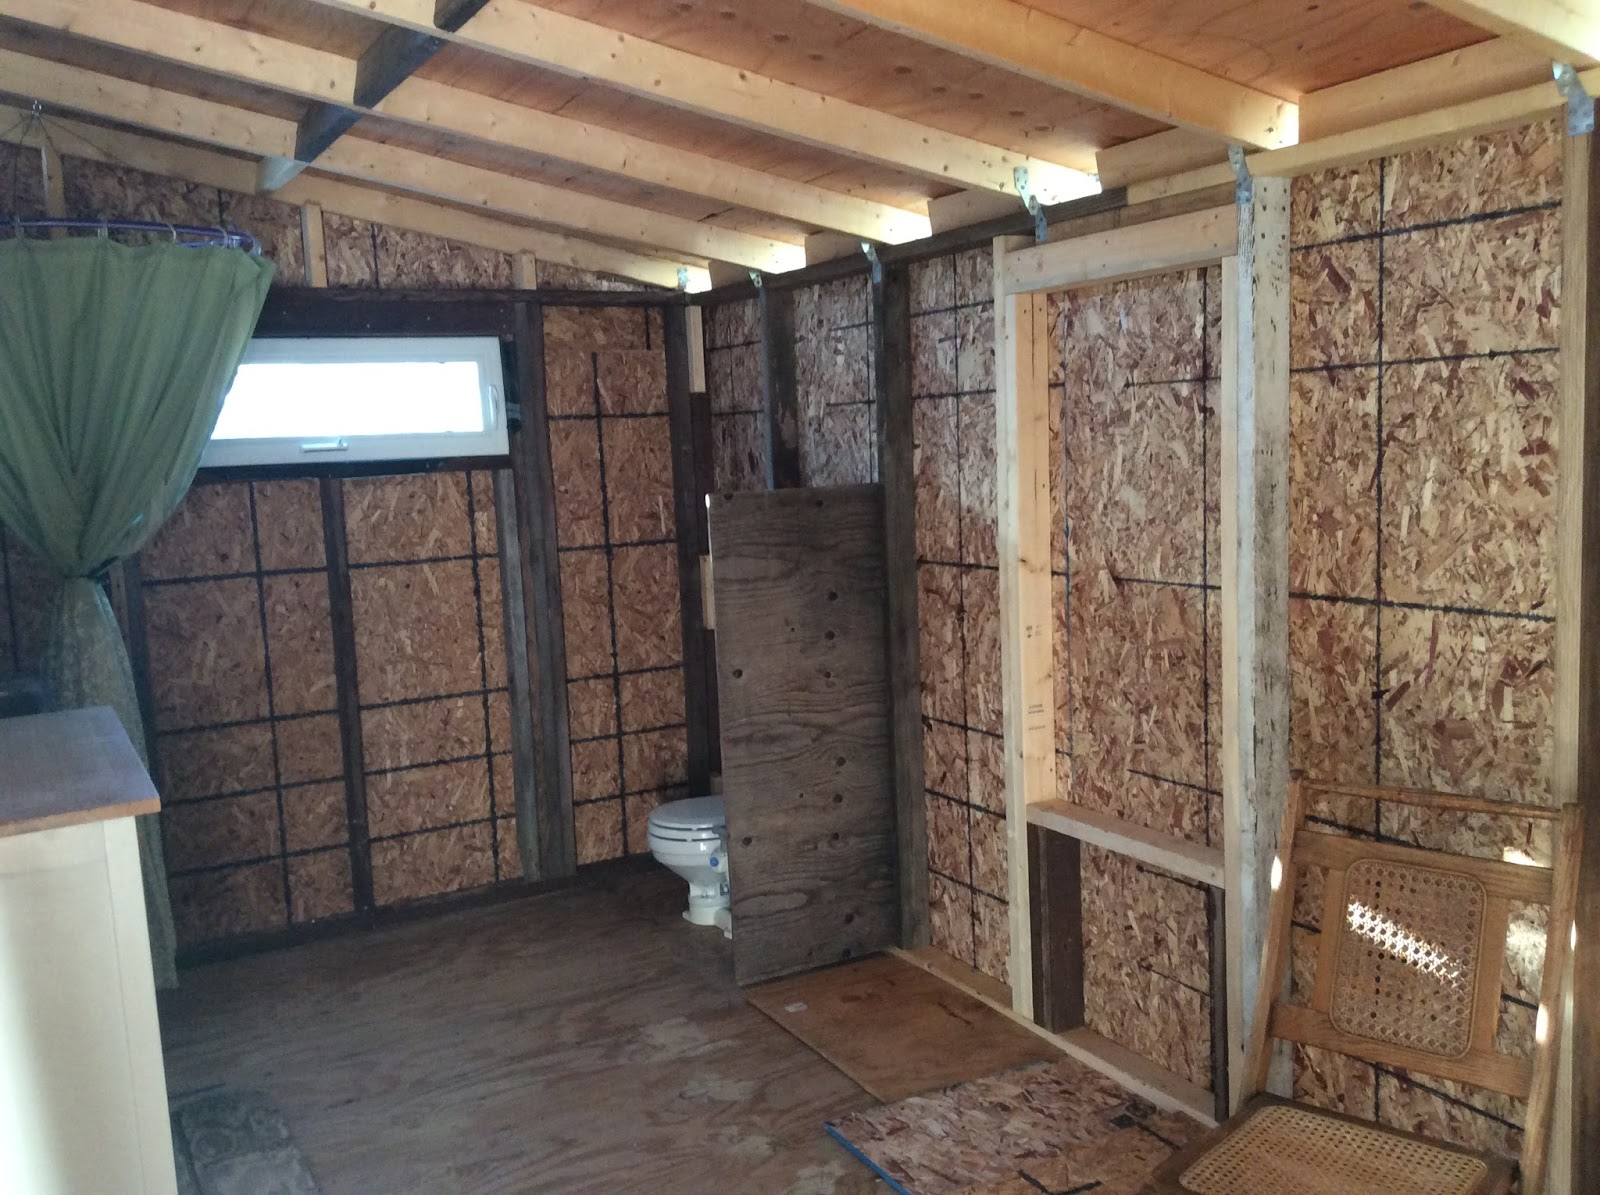
The marine toilet behind a temporary "wall" to get an idea of space in the bathroom. The framed portion of the wall will be where the kitchen cook stove will be.

And lastly, looking forward the cushions on the floor are where the built in sectional sofa/bed will be.
Until next time...

Front window installed and tin roof on!
:)
Things are moving along at a decent pace for me in my quest to finish the exterior of the beach house. Last week, I managed to install the second horizontal side lite.


I was BUSY this weekend.....check it out!


 My kitchen window in..


My order of Exteria rough cut weathered look vinyl shingles showed up on Friday afternoon.


Saturday morning putting the first pieces on. These are called starter strips. I snapped a chalk line and followed it to make sure I was level. I even measured from the front, middle and end from chalk line to top of top sill to be sure my measurements were the same. And they were.

This is one panel. In the center is a hole for your first roof nail. Very important fasten point here. It allows for expansion and contraction of the panel in either direction which helps prevent any warping. This and the fact that the fasteners are not put in too tightly. About the width of a dime.


I was a bit intimidated at first, but after reading and re-reading the installation instructions, I felt more confident I was doing it right.
As this is a structure that will endure high winds due to travel, I chose to use every fasten hole which I pre-drilled for easier hammering into my OSB sheathing. It may seem like more work, but trust me, in the long run it isn't.

At the end of each panel, you want to make sure you put your roof nail in the last opening at the side, NOT the last one at the top. You will overlap the next panel and fasten it with this panel at the top opening.

This is the J channel on the door entry that your panels fit into. J channels go around windows and doors to create a smooth finish look.

I love the beach house feel with my new vinyl shingles...what do you think? I cannot wait to finish! Until then...
October 1, 2016
October 1, 2016
The weather has not been too agreeable for me to caulk around the windows before I can carry on with the vinyl siding...so while I waited, I worked on the wheel wells inside. Here are some photos:
 "The passenger side"...
 Temporary covers until I get good plywood.


"The drivers side"


These wheel well boxes give me 6.5" of clearance from the top of the tire to the plywood lid, which is more than enough suspension travel. Every little bit I get done is that much less to do and that much closer to the real fun part......the interior decor! :)
Until next time...
November 9th, 2016
A few more photos of my progress:


 This weekend I will try to complete the port side as well as the stern. Until then...
November 9th, 2016
A few more photos of my progress:


3 comments:
Great job guys!! You got soooooo much done in 1 weekend!!
Nola
Quite a project!
Looks HEAVY!
Will feel more solid that way when it's parked!
Yes it is, Craig! But, it is a labor of love. It isn't as heavy as it appears, but I will know more when I tow it over the scales. Stay tuned for that informational post. And, thanks for commenting!
Post a Comment