CLICK HERE FOR MOST RECENT UPDATE!The weather has been great for working on The Beach House, and I have been trying to get out there each night to do what I can. It is beginning to feel like I am really making head way toward completion!
And, that is exhilarating to me!! Yesterday, I ordered my RV toilet and shower pan in order to complete my plumbing. I need to do that now to test my connections for leaks (or, no leaks!) to then close in the inner walls.
Here's a few pictures of what I've done since my last post....
My new blue door! I love my new blue door! The color is Black Sapphire by Behr. It is a great paint. I think it really compliments the gray shingle siding nicely.
I'm getting the tongue and groove pine up fairly quickly. Once that is complete, I will be "pickling" it....like a white wash.
The bathroom walls have a distressed look paneling as you can see in this photo.
On to the starboard side, I've been getting insulation up where there are no water lines to check.
I ordered my vinyl flooring, so while I waited for it to arrive I made a paper template for my cutting guide as the vinyl flooring is one piece! Yes, one piece!! I didn't want any seams and this stuff is amazingly comfortable on my bare feet!!! My only reservation is will it sustain dropped items and such as well as manufactured flooring or a more rigid vinyl?...probably not, but I went ahead and decided on it. I hope you like the looks as much as I do.
I unrolled it on the lawn to attach my template for cutting.
I think it really brings things together with the dark flooring and lighter walls. What do you think?
October 2017
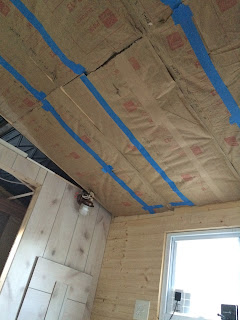
Just a quick update...I have been hanging my insulation on my ceiling this week. My back is NOT happy, but I am! :) Photo will follow soon.
I had to rip each run and tape because my build is 24"on center and the only batts I could get were 16"on center. A lot of extra work, but it's almost done. Only the bathroom ceiling is left. Phew!
Here is the most recent activity on my tiny house build...
February 1, 2018
Here is the most recent activity on my tiny house build...
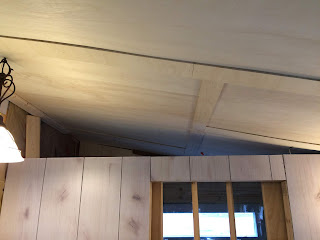
After several failed attempts at hanging ceiling panels by myself, (oh, my aching arms!!!!!)
I recruited the help of my husband.
Looking in, the first panel is up! Thanks, honey!
After this one went up the rest followed fairly well.
With these panels up, this space is holding its heat much better now! I still need to trim out the seams and hang the supports at each wall. But just getting this done makes all the difference between working in a t-shirt vs three layers and gloves, hat and wool socks!
My itty-bitty electric fireplace...
And my new Envi electric convection heater...love it!!
After two full weeks of temps in the teens, we had a break in the weather. I jumped at the chance to finally go pick up my cook stove. It is a beautiful little vintage gas stove with oven and I truly cannot wait to do some baking in it! It was a gift from a friend of mine. Thank you, Joe!
But, this is where I like to say that I tend to "put the cart ahead of the horse" more times than not!
My original intent was to place the stove with the back against the wall where the window is. If you look closely, you'll see my light switch and outlet sits there. So, for now my stove sits this way. I am sure I will re-arrange placement a few dozen times before I bolt it down. Until then, I'll just stand here and admire it! :)
'til next post...
May 20th, 2018
May 2018
I've been plugging along on the build and haven't been doing very much updating here on my blog. I never thought I'd be one of those bloggers...but here I am neglecting to post. I understand now how it is so easy to neglect posting as the finish line is within arms reach. But, here I am with an update! I hope you enjoy it.
I am still working on the sectional/bed area. Always a new idea to try in this area!
The space above the bathroom.....my original plan was to have a flat ceiling and utilize the wedge above as cubby storage. I opted to put a wall up to the ceiling.
Here it is framed out. I then added rigid board insulation and finally the bits and pieces of what was left of my faux wood paneling.
Moving into the bathroom....I've installed a white half wall of flexible bead board panels and rails.
My shower valve
and fixture.
And my tank-less hot water heater.
I still need to hook up the fittings on the heater and finally test for (no) leaks. Then, I can close in my walls.
My vessel sink! One of my favorite things in there.
August 2, 2018
More interior work.....
More interior work.....


6 comments:
I can't wait for the first girls weekend !! It looks AMAZING
Thank you so much, Lisa! It is finally feeling like I am close to the finish line. :)
Looks great...and I would expect no less from you, Fruit. :) <3
Thanks, Kath!
Wow !!!! Simply amazing Gail.what a great job
Thank you, Lisa!
I worked a bit out there last night and turned the stove so the back was against the wall where the window is. This is how I originally wanted it, but with the outlet and light switch there, I thought that I had to do something else. Turns out, the stove needs to be a couple inches from flush against the wall to allow for propane line to have elbow room. Now, I can just slip my hand behind the back of the stove to turn the light on.
Thanks for commenting!
Post a Comment